Understanding The Mechanics
We can distinguish 4 main phases during the encounter
Objective Priority Final Phase > Horn Phase > Mini Boss Phase > Crystal Phase
The encounter time limit is 10 minutes, after surpassing that time you will instantly lose.
Crystal Phase

Before destroying the 5th Crystal everyone should be focusing the Mini Boss and prepare for the Horn Phase
One crystal at the time will randomly appear at the following locations : Left Rib, Left Arm, Right Rib, Right Arm, Chest, Back
Do not destroy the 5th Crystal when 2 or more members are down
 Mini
Boss Phase

Usually spawn within 1 minute after killing the previous one.
Only one Mini Boss can be present at a time.
During this phase one player should be focusing on the Crystal
Horn Phase

During the encounter you will have to destroy the horn twice. In both of the cases the Storm King will randomly fall and expose the horn. The first time it happens it will be 4 tiles up, the second time 3 tiles up.
Each time you destroy 5 Crystals the horn phase begins. If you kill the Mini Boss before this phase starts the mini boss won't spawn.
Usually you have to kill 2-3 Mini Bosses between the Horn phasesIf you fail to destroy the Horn the Storm will close, resulting in Defeat.
Each player should build their own structures towards the Horn and avoid editing or building over another player
Final Phase

Make sure all the ![]() Ninja
players use
Ninja
players use ![]() Kunai Storm
and the
Kunai Storm
and the  Soldier the
 ![]() War Cry if available. You should be keeping the
War Cry if available. You should be keeping the ![]() Hover Turrets
strictly for the final phase.
Hover Turrets
strictly for the final phase.
Storm
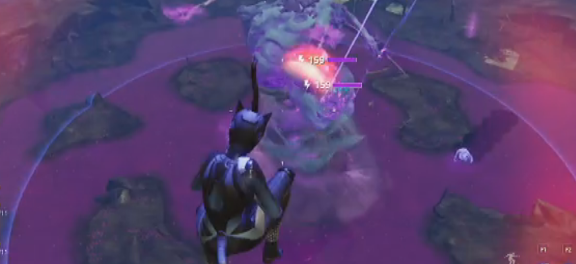
As long the Mini Boss is out on the field, the Storm will close in on you till the point everyone is dead.
Each time you kill a Mini Boss, the Storm will be pushed back.
Environment
The water is poisoned and will keep damaging you while you stand in it
Storm King Abilities
Beam

The Storm King will randomly choose a player on the map and will channel a blowing beam which will destroy any structures and kill any players in its path.
Tip : Avoid standing close to each other
Meteors

Storm King will summon multiple meteors that will fall across the map damaging nearby structures and players
Tip : Building a roof above you will keep you safe
Stone

The Storm King will throw a giant stone which will deal significant amount of damage to players and structures
Tip : Building a roof above you will keep you safe
Shout

The Storm King will perform a destructive shout which will destroy all player structures on the map
Communication
Communication is crucial to succeed with the run, make sure you are informing your teammates about the Beam, Mini Boss spawns or the Crystal position
You should also call the number of destroyed Crystals
Building
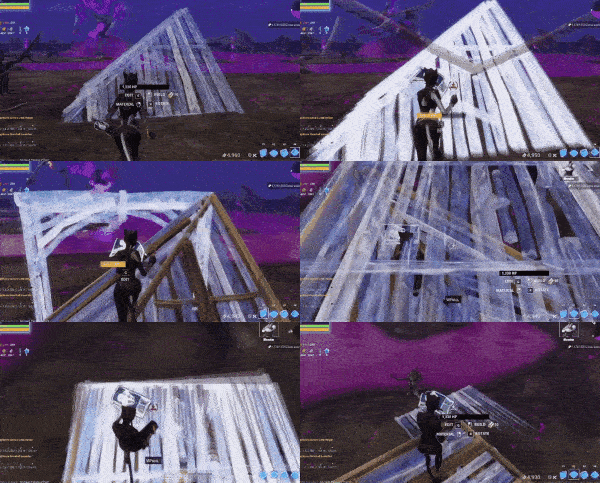
When it comes to ![]() Ninja players the
building aspect is straight forward and much easier than it is for
Ninja players the
building aspect is straight forward and much easier than it is for  Soldier, because lack
of the double jump.
In both cases you avoid building stairs on the ground level, because it will allow the husks to path to you.
Pre Build your structures in the cave, use the arches and ramps.
Avoid over building, each game can consume above 3000 resources if placed wrongly.
You should never stand on the ground
Build at least 1-2 tiles up to prevent the small husks jumping on you
![]()
![]() Are perfectly fine
to use
Are perfectly fine
to use
![]() Avoid using wood
because of the low hit points value, it will get easily destroyed by the Meteors
Avoid using wood
because of the low hit points value, it will get easily destroyed by the Meteors
Your primary healing source will be Cozy Campfire
Keep in mind that you can be affected only by 2 Cozy Campfires at a time
Weapon Setup
Ideally you want to have 1 Sniper Rifle, 1 Rocket Launcher, 1 Melee weapon for each time. For further dps analysis check this link
Melee Weapons
2x Critical Damage, 1x Critical Rating, Physical Element if possible, Attack Speed/Damage
Ranged Weapons
2x Critical Damage, 1x Critical Rating, Physical Element if possible, Reload Speed
Team Composition
The most suitable setup would consist of 3 ![]() Ninja players and 1
Ninja players and 1
 Soldier.
Each party member should have ![]() Adrenaline Rush to revive other members.
When it comes to the second gadget you can choose between
Adrenaline Rush to revive other members.
When it comes to the second gadget you can choose between ![]() Hover Turret or
Hover Turret or
![]() Slow Field , the Hover
Turret will help you at the final phase where the
Slow Field is usable during the Mini Boss phase.
Adrenaline Rush shouldn't be used as your healing source!
Slow Field , the Hover
Turret will help you at the final phase where the
Slow Field is usable during the Mini Boss phase.
Adrenaline Rush shouldn't be used as your healing source!
Both variants will utilize the
 Blast From The Past team perk
![]() Saurian Might and
Saurian Might and
![]() Saurian Hide.
Saurian Hide.
The Blast From The Past (Removes all shield and increases Max Health by 200%) was available in the Patch 9.0 (Tales of Beyond Quest), and to active requires two Dinosaur heroes. The main purpose of that perk is to get as much health points as we can get, which will greatly increase your survivability during the encounter. There is no other alternative for this slot.
Option 1 - Lynx Kassandra (Recommended)
As the Commander we are going for Lynx Kassandra which is the only hero with the ![]() Hang time perk which grants hover for 4 seconds
and
increases damage by 140% after using the
Hang time perk which grants hover for 4 seconds
and
increases damage by 140% after using the
![]() Kunai Storm ability.
Kunai Storm ability.
Kunai Storm has 15 seconds cooldown and you
should use it
whenever there is a
![]() Mini Boss on
the map
as well as during the crystal phase and the final phase
Mini Boss on
the map
as well as during the crystal phase and the final phase
Lynx Kassandra is strong in the crystal,mini boss and final phase.
Option 2 - Whiteout Fiona
Whiteout Fiona is strong in horn phase because of the increased critical rate for swords, axes, and scythes.
Keep in mind that it is not worth using this loadout when you dont have one of the following weapons.
Additional perks
Having the basic required loadout, you have to work around the other perks. Usually you will need to have at least 1 Melee Damage perk and 2 Ranged Damage perks depending on the available perks/weapons.
Ranged Damage
Depending what weapon type you are using choose one
For Sniper Rifles


For Rocket Launchers


Melee Damage
Depending what weapon type you are using choose one
For Swords, Axes, and Scythes

For Hardware weapons



Team Perk

Support Team


Gadgets

Team Perk

Support Team


Gadgets

Team Perk

Support Team


Gadgets
![]() War Cry grants nearby allies +45% weapon damage and +20% melee attack speed for 12
seconds.
War Cry grants nearby allies +45% weapon damage and +20% melee attack speed for 12
seconds.
The recommended Solider to use Special Forces Banshee. This hero benefits from the Fight or Flight perk which causes War Cry to grant an additional 25.5% Weapon Damage and Movement speed to all those in range when the war cry ability is cast.
This soldier is the most important hero in the horn phase, and it is essential this player reaches the horn as soon as possible to use War cry.
However, if this is not possible, war cry has a base range of 5 tiles vertically and 4 tiles horizontally, meaning players at the horn can benefit from war cry so long the solider activates it within range of these players. Players have to be in range of war cry when the ability is cast; no benefit will be received when entering range whilst the ability is active.
Additional perks
Having the basic required loadout, you have to work around the other perks. Usually you will need to have at least 1 Melee Damage perk, 1 Defensive/Utility perk, 1 Ranged Damage perk depending on the available perks/weapons.
Defensive/Utility Variants

Ranged Damage
Depending what weapon type you are using choose one, keep in mind that Locked and Reloaded works only with Santa's Little Helper
For Sniper Rifles choose one


For Rocket Launchers


Melee Damage
Depending what weapon type you are using choose one, keep in mind that Locked and Reloaded works only with Santa's Little Helper
For Swords, Axes, and Scythes

For Hardware weapons


Other compositions
Another team perk variant would resolve around the Totally Rocking Out team perk, which would require two rad heroes. The main advantage of this build is the ability to deal exceptional damage to the horn. Proper execution is crucial, before entering the encounter you need to harvest 2 cars, 1 trolley, 1 car meter, 1 stop sign and 1 carousel in the lobby area. And then a metal shack to left of where you teleport, in order to acquire Sub Wafers
This composition is useful especially in 2-3 player runs.
Working best if you use 3x Critical Damage perks on melee weapon


 Mythic Cache Weapons
Melee Weapons
Ranged Weapons
Frequently Asked Questions
Q: How to check if I have the quest
If you are eligible to receive the Mythic Weapon Cache you should see the following quest in your quest log.
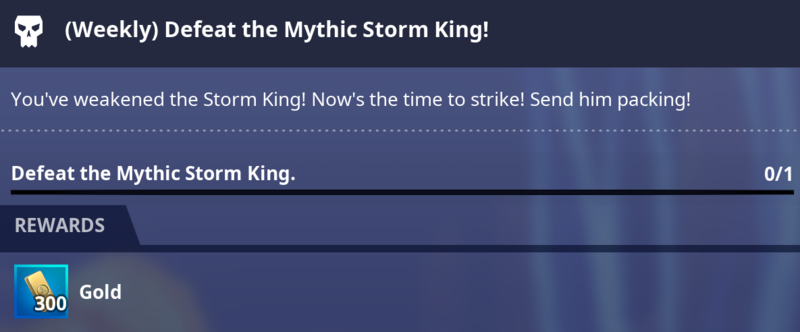
Make sure its labeled as Weekly, since there is a similar Daily variant. If you don't see it, it much be caused by
- Inappropriate Home Base Power Level / or quest progression
- You already did that quest
- You didn't complete the prior quest
After completing the following quest, you will unlock the (Weekly) Defeat the Mythic Storm King! quest
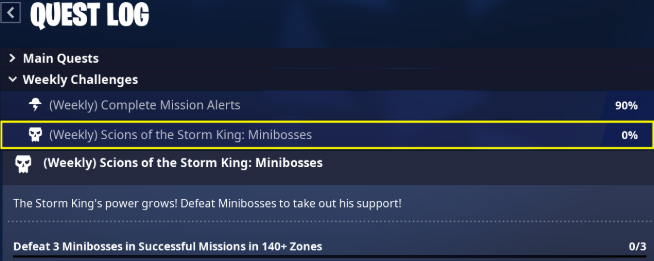
The objective may vary, but have to be completed in ⚡140+ zones
- Kill 50 Husky Husks
- Kill 300 Elemental Husks
- Kill 20 Mist Monsters
- Kill 3 Mini Bosses
- Complete 1 Storm Chest
- Rescue 10 Survivors
Q: What is the lowest ⚡ Power Level
The default lowest ⚡ is 122, the quest should be available after Twine Storm Shield Defense 5 (subject to change)
Q: How often can I get the mythic schematic
You can acquire the schematic once a week after the weekly shop reset. Before that you have to complete the quests.
Q: Can't find a team?
The easiest way would be to check out the following streams, and follow their rules. Green icon indicates that the streamer is live now. The list is cached for 5 minutes.